This was a fairly large project. Three murals, one a cutout transported and two done on site. The collection of photos shows before and after shots and my original sketch. Wonderful people in Superior, great community on the border of Kansas.
The Mural Garage
Murals done for schools, businesses, churches & homes. Prices are always reasonable and turn around time is quick. Pricing sheet available upon request. Average price is $20.00 per square foot. Depending on size of mural - usual onsite finish time is within 2 to 3 days. Cut outs may require more time. For more information or a quote email jasondfolkerts@gmail.com
Onida Sully Buttes Chargers Mural
This 9 x 9 mural in Onida, SD was painted in the new addition of their High School. Superintendent Kevin Pickner wanted to have a nice visual as students entered the concourse.
The mural took 10 hours to complete, not including design time and a 4 hour drive from Sioux Falls.
The cost of this mural was approximately $1800.00.
Below is a photo I snapped on the way to Onida, which is 30 miles northeast of Pierre. Miles and miles of sunflowers surround the community. Amazing!
Now is the time! Murals & Cartoon Lessons for Schools
Now is the time to create and design a mural for your school, church or business.
I am offering murals at $20.00 a square foot and will bid out full projects with a free quote.
Contact me at jasondfolkerts@gmail.com
I also am contracting with schools for Cartoon Workshops.
These are one and two day events that students love!
Same contact process at jasondfolkerts@gmail.com
Page down on this blog to learn more about each of these unique opportunities.
Hope to hear from you!
Two new books by Jason Folkerts
I have two new books that I wrote and illustrated available.
When Monsters Visit is co-written by my daughter McKennan. We did a downtown Sioux Falls Chalk the Walk drawing of this story.
Sioux Falls a Great City is 20 drawings of buildings that are landmarks and iconic that have a fun backstory told. both are available at www.storyjumper.com under my name in search box.
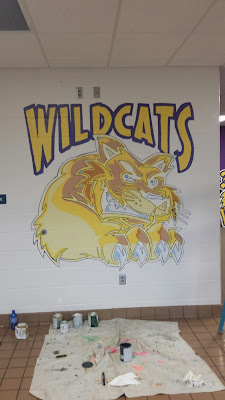
Wildcat Wall Mural, Custer, SD
This was the second part of the project completed for the Custer Wildcats Elementary School. This image is on a wall facing the cafeteria and next to a hallway with lots of traffic. I went with a simple Wildcat look that matches the cutout design. I modeled it after a clipart design I purchased for the project. I had to modify it some given the original was a tiger... But hey, the difference is minimal and the paw was the main thing that needed to work for this design.
Creating the Custer Elementary Wildcat Cutouts
Creating cut-out murals is a lot of fun and a good idea for schools that like the mobility of being able to move them around if need be. Below is the process I used to create three cut outs for the new Custer SD Elementary school on the West end of the State
Talking with Principal Hiltunen we decided on three cut outs that would help her and the students. They would each be directional in pointing out sections of the building and we also needed to design a brand new Wildcat to match their school colors of purple and gold. Up to this point the school did not have a permanent mascot image they were comfortable with. I did some searching online through several clipart companies and discovered several images that may work. I chose two and purchased them for models that I wanted to use. Actually one was a tiger, but it had the right look for what was required. The price of clipart varies. This project was very affordable for clipart models, only $12.00.
Step one is to sit down at the drawing board and design what is needed according to the clients needs. After a couple of simple changes and modifications with the artwork we came up with three designs everyone liked and wanted on the wall.
Step two is to buy the wood. MFI 3/4 inch wood is the best (I think) for mural cut-outs. It is a bit heavy - but strong and no grain. Excellent to cut and paint on. I prime the 4x8 sheets with two coats of white primer.
Step three is to transfer the design on paper to the larger 4x8 sheet of plywood. I go as large as I can.
Step four is the fun part - cutting it all out. This takes time and patience. I have in time really come to enjoy this part of the creating process. At first it was tricky getting all the little cuts down. But I am getting better all the time.
Step five is to begin painting all three cut-outs accordingly. As you can see I use my garage when the weather is nice. I try to paint them all in tandem using the same layering process of paint - two coats for each color.
The final product is done and ready to be shipped to the school and mounted onto the walls.
Subscribe to:
Comments (Atom)


